 Save
Save My cousin texted me three weeks before her graduation asking if I could bring something to the party, and honestly, I almost said no because I was swamped. But then she sent a photo of her cap and gown, and something clicked—this was actually happening, and I wanted to mark it somehow. I started thinking about what I could make that felt celebratory without being complicated, and these cupcakes with their little fondant caps came to mind. They're the kind of dessert that looks like you spent all day fussing when really you just needed an afternoon and a little creativity with candy.
I made these for the first time at my kitchen table on a Thursday evening, with my phone propped up so my cousin could watch via video call while she was studying for her last exam. When I stuck the first cap on a cupcake, she screamed so loud her roommate came running, thinking something was wrong. Turns out she just loved how they looked, and that feeling of nailing something for someone right when they needed a boost stayed with me even after the party was over.
Ingredients
- All-purpose flour: The foundation of a tender crumb—make sure you're measuring by weight or spooning and leveling if you're using cups, because packing it down will make your cupcakes dense.
- Granulated sugar: Creaming this with butter until it's pale and fluffy is the secret to light, airy cupcakes, so don't skip that step or rush it.
- Unsalted butter: Softened is key here, and if you forget to take it out of the fridge, microwaving it in short bursts works better than you'd think.
- Eggs: Room temperature eggs mix in more smoothly, so take them out of the fridge a few minutes before you start baking.
- Whole milk: This keeps the crumb moist without making it heavy, and the cool temperature actually helps balance the warm butter mixture.
- Baking powder: Fresh is better, so if yours has been sitting for a year, grab a new can.
- Pure vanilla extract: The good stuff matters here because vanilla is one of the main flavors—imitation extract will taste noticeably different.
- Powdered sugar: Sift it before measuring or it'll clump, and that makes for grainy frosting that won't spread smoothly.
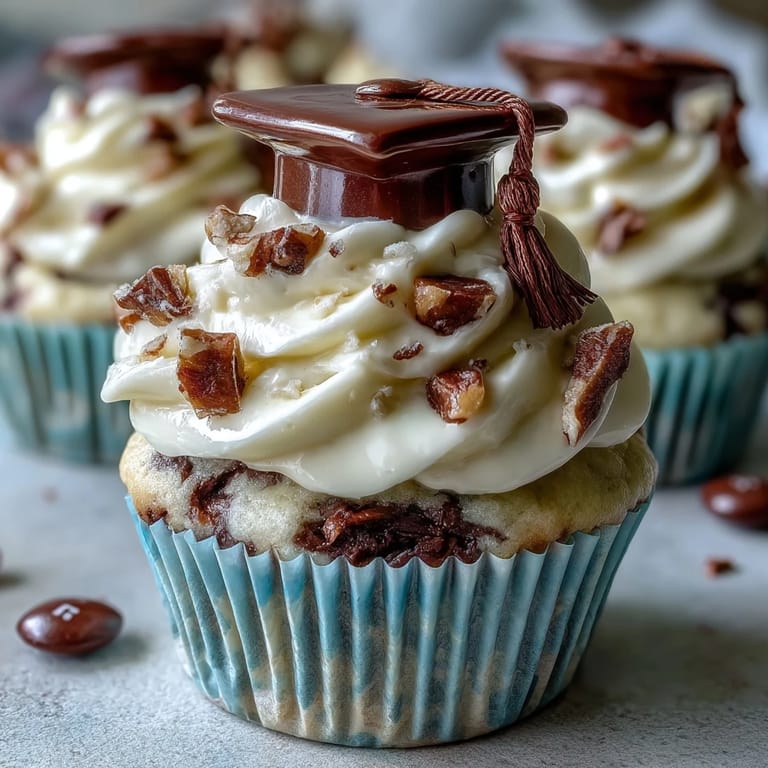
- Mini peanut butter cups and chocolate squares: These become your grad cap's base and crown, and using good quality candy makes the whole thing taste less like assembly and more like real food.
- String licorice or sour candy strips: These are your tassels, and they add color and whimsy—pick colors that match the school or just go with what looks fun.
- Mini M&Ms or candy pearls: The button on top of the cap, and this is where you can sneak in school colors if you want.
Tired of Takeout? 🥡
Get 10 meals you can make faster than delivery arrives. Seriously.
One email. No spam. Unsubscribe anytime.
Instructions
- Get your oven ready and prep the pan:
- Preheat to 350°F and line your muffin tin with paper liners so they sit flat and don't slide around. This takes two minutes and saves you from sticky cupcakes later.
- Cream the butter and sugar into clouds:
- Beat them together for about two to three minutes until the mixture is pale, fluffy, and looks almost like frosting itself. This is where the magic happens, so take your time and don't skip it just to hurry.
- Add the eggs one at a time:
- Crack each egg in separately and let the mixer do the work for a minute before adding the next one. This helps them incorporate evenly instead of creating a broken, curdled-looking mixture.
- Stir in vanilla and create your rhythm:
- Add the vanilla, then alternate adding your dry ingredients and milk, starting and ending with dry ingredients. Mix gently after each addition—you're not making bread dough here, just bringing everything together.
- Divide the batter with care:
- Use an ice cream scoop or a spoon to drop batter evenly into each liner so your cupcakes bake at the same rate. If some are too full and some are too empty, they'll finish at different times.
- Bake until a toothpick comes out clean:
- Watch for eighteen to twenty minutes and test with a toothpick inserted into a cupcake in the middle of the tin. If it comes out clean, you're done; if it's wet, give them another minute and check again.
- Let them cool all the way down:
- This is non-negotiable if you don't want your frosting to melt the second you spread it. Set the pan on a rack and actually wait for them to reach room temperature before frosting.
- Make frosting that's actually spreadable:
- Beat softened butter until it's smooth, then gradually add powdered sugar a little at a time so you don't end up with a cloud of sugar dust all over your kitchen. Once it comes together, add milk and vanilla and beat until it's fluffy and holds a peak when you lift the beaters.
- Frost with a gentle swirl:
- Use a spatula or the back of a spoon to spread frosting in a swirl on each cooled cupcake. There's no wrong way to do this, and the imperfections actually make them look more homemade and charming.
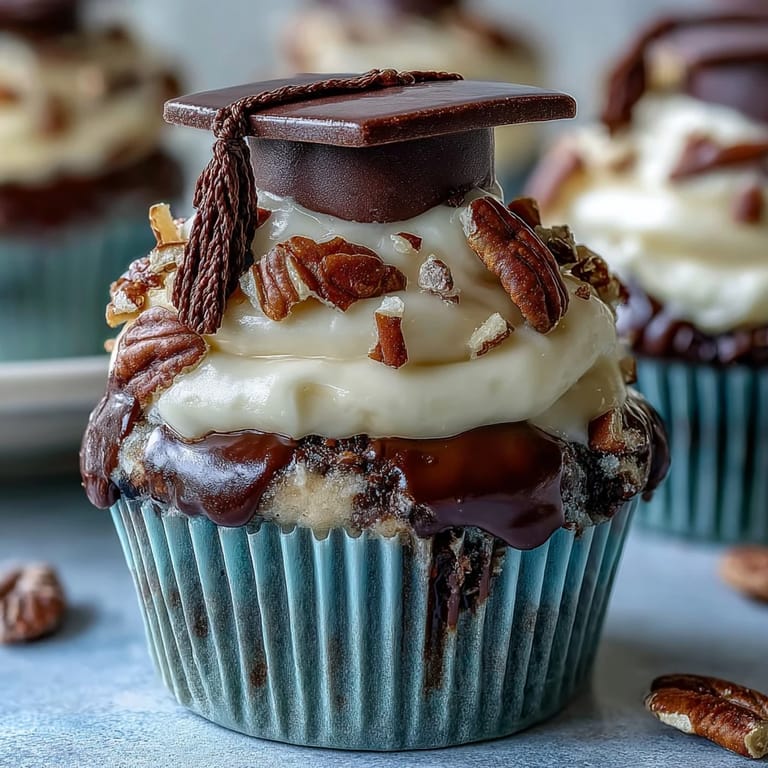
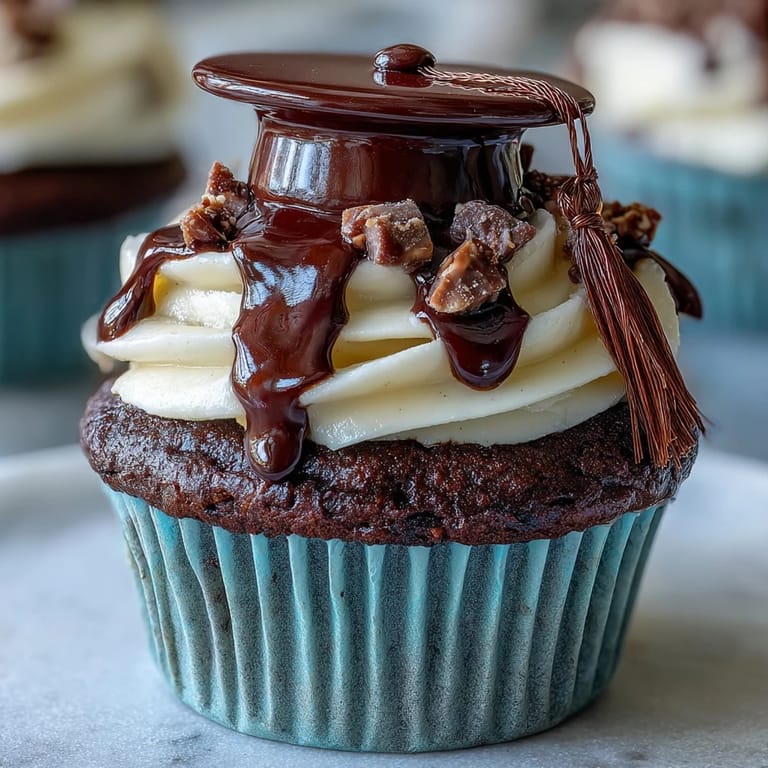
- Assemble your graduation caps with precision:
- Lay out all your cap-building supplies on a clean surface so you can work assembly-line style. Place a chocolate square flat-side up, attach a mini peanut butter cup upside-down in the center with a tiny dab of melted chocolate or frosting, add a piece of licorice as the tassel, and top with a mini M&M or pearl as the button.
- Let the caps set before crowning the cupcakes:
- Give them a few minutes to firm up so the components don't shift when you place them on top. Then gently press each cap onto a frosted cupcake and step back to admire your work.
 Save
Save I watched my cousin bite into one of these at her party, and the way her whole face lit up as she realized the cap was made of real candy, not just fondant, reminded me that sometimes the best gifts are the ones you make with a little chaos and a lot of intention. These cupcakes became a story she told her friends, and that's really what a celebration dessert should do.
Why These Cupcakes Work for Any Milestone
Graduation feels specific, but the truth is, anything that marks a moment—a promotion, a new apartment, a good test score—deserves something special that tastes good and looks intentional. The beauty of these cupcakes is that you can swap the tassel colors, change the candy pearls to match someone's favorite colors, or even swap in different toppers if you want. I made a batch for a friend's baby shower by swapping the graduation caps for tiny fondant strollers, and they worked just as well.
The Frosting Moment
There's something deeply satisfying about making frosting from scratch instead of buying a tub, and I think it's because you actually taste the vanilla and butter instead of just sweet. The first time you spread it on a cupcake and realize you made something that good, you'll understand why people make buttercream frosting even though it takes five extra minutes. If you want to get fancy, you can add a tablespoon of lemon juice or a pinch of almond extract to change the flavor completely, but honestly, vanilla is perfect as is.
Storage and Last-Minute Saves
These cupcakes actually taste better the next day because the flavors have time to meld, so if you're stressed about timing, bake them the day before and frost them in the morning. Unfrosted cupcakes stay good in an airtight container for three days, and the buttercream frosting keeps in the fridge for up to a week, which means you can make it ahead and bring it to room temperature when you need it. If you're bringing these to an event and worried about them getting squished in the car, pack them in a sturdy container with the cupcakes on the bottom and a layer of parchment paper on top so nothing slides around.
- Room temperature butter makes all the difference in getting your frosting smooth and spreadable.
- You can make the caps the night before and store them in a cool, dry place so they stay crisp.
- If a cap toppler feels fragile, a tiny drop of frosting on the bottom will hold it in place without looking messy.
 Save
Save Making these cupcakes felt like I was celebrating with my cousin instead of just showing up with dessert, and that's the whole point of cooking for people you care about. If you're making them for someone's big moment, they'll taste even better because they'll remember the effort that went into them.
Recipe FAQ
- → What ingredients create the cupcake base?
The base is made with all-purpose flour, granulated sugar, softened butter, eggs, milk, baking powder, salt, and vanilla extract for a classic moist texture.
- → How are the graduation caps assembled?
Chocolate square candies form the flat cap, topped by an inverted mini peanut butter cup as the mortarboard center, with licorice tassels and mini candy buttons attached using melted chocolate or frosting.
- → Can the toppings be nut-free?
Yes, swap mini peanut butter cups with chocolate squares to avoid nuts, ensuring allergen-safe decorations.
- → What’s the best way to store finished cupcakes?
Keep them in an airtight container at room temperature for up to two days to maintain freshness and frosting texture.
- → How can I customize the frosting colors?
Add food coloring to the buttercream frosting to match school or party color themes before spreading it over the cooled cupcakes.
- → What tools are recommended for preparation?
Use a muffin tin with liners, mixing bowls, an electric mixer, spatula, and piping bag or spoon for frosting application.