 Save
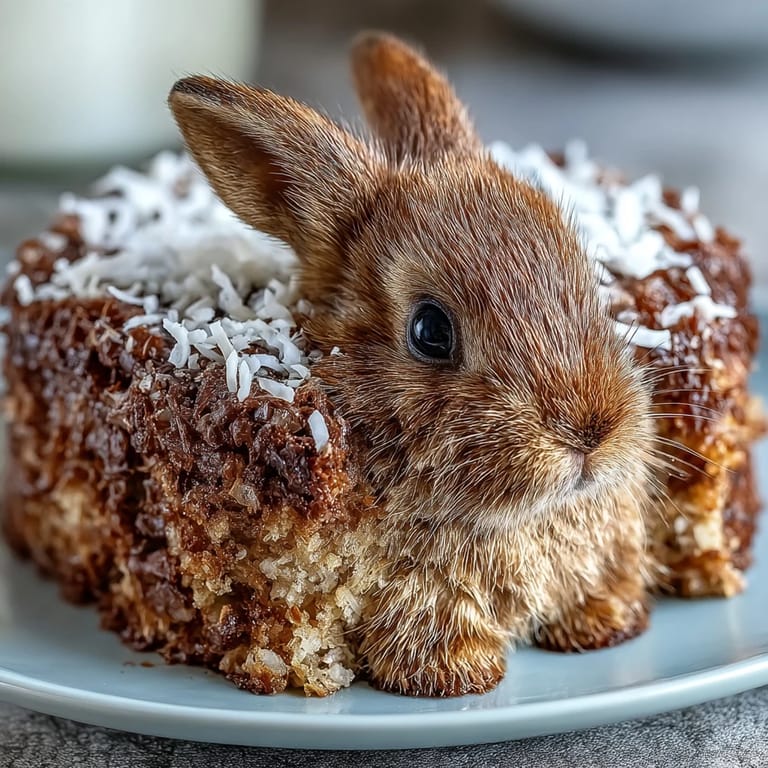
Save My daughter burst through the kitchen door three days before Easter, clutching a magazine cutout of a bunny cake. The photo showed this absurdly charming creature made entirely of cake and coconut, and she looked up with those hopeful eyes that meant I was making it whether I had baking experience or not. That afternoon, covered in flour and coconut shreds, I discovered that sometimes the messiest projects create the clearest memories—especially when a six-year-old is your sous chef, taste-testing frosting and giggling at every step.
The real magic happened when my neighbor peered over the fence and saw this fuzzy coconut bunny sitting on the picnic table. She asked if it was store-bought, and when I said no, she immediately wanted the recipe—not because it seemed hard, but because it looked like love made edible. That's when I understood: this cake isn't really about technique at all, it's about creating something that makes people smile before they even taste it.
Ingredients
- All-purpose flour (2 1/2 cups): The foundation—make sure it's fresh and not packed down when you measure, or your cake will be dense and heavy.
- Unsalted butter (1 cup plus 1 cup for frosting): Softened butter is non-negotiable here because cold butter won't cream properly with the sugar, and you'll end up with a gritty, grainy texture.
- Granulated sugar (1 3/4 cups): This aerates the batter when creamed with butter, creating that light, tender crumb you want.
- Large eggs (4), room temperature: Cold eggs seize up the batter—let them sit on the counter for 30 minutes before you start, or place them in warm water for five minutes.
- Vanilla extract (1 tbsp plus 2 tsp): Real vanilla makes a noticeable difference, but if you only have imitation on hand, it'll still work just fine.
- Whole milk (1 cup): This keeps the cake tender and prevents it from becoming too sweet or dense.
- Powdered sugar (4 cups, sifted): Sifting removes lumps and creates silky frosting—don't skip this step or you'll have grainy spots in your coating.
- Sweetened shredded coconut (2 cups): The star of the show; it gives your bunny that fluffy, furry appearance that makes everyone go aww.
- Jelly beans and chocolate chips: These bring personality to your bunny's face and paws—choose colors that make you happy.
Tired of Takeout? 🥡
Get 10 meals you can make faster than delivery arrives. Seriously.
One email. No spam. Unsubscribe anytime.
Instructions
- Set yourself up for success:
- Preheat your oven to 350°F and get those cake pans greased and floured while the oven warms up. This little act of preparation prevents panic and ensures even baking from the moment you pour in the batter.
- Combine your dry ingredients:
- In a medium bowl, whisk together flour, baking powder, baking soda, and salt—whisking aerates the flour and distributes the leavening agents evenly. Set it aside and don't overthink it.
- Cream butter and sugar until light and fluffy:
- This takes about three to four minutes with an electric mixer on medium speed, and you'll see the mixture transform from dense and grainy to pale and cloud-like. This step is doing serious work, aerating the batter with tiny air bubbles that make the cake tender and light.
- Add eggs one at a time, then vanilla:
- Beat each egg in fully before adding the next, which takes about one minute per egg. Adding them slowly prevents the mixture from breaking or becoming greasy.
- Alternate flour and milk, starting and ending with flour:
- Add about one-third of the flour mixture, then half the milk, then half the remaining flour, then the rest of the milk, then the final flour portion. Mix on low speed just until combined after each addition—overmixing at this stage develops gluten and creates a tough, dense cake.
- Bake until golden and a toothpick comes out clean:
- Divide batter between pans and bake for 30 to 35 minutes; start checking at 30 minutes because every oven is different. The cakes should spring back when you lightly touch the center, and a toothpick inserted there should come out with just a few moist crumbs, not wet batter.
- Cool completely before assembly:
- Let the cakes rest in the pans for 10 minutes, then turn them out onto a wire rack and wait until they're completely cool—warm cake falls apart when you try to carve and stack it. This patience pays off in the decorating stage.
- Make the frosting:
- Beat softened butter until creamy, then gradually add sifted powdered sugar a cup at a time, scraping down the bowl as you go. Add vanilla and milk until you reach a spreadable consistency—it should be thick enough to hold the cake pieces together but soft enough to spread smoothly.
- Carve your bunny shape:
- Place the whole cake round on your serving platter to form the body, then cut the second round in half and stand those semicircles upright at one end to create the head and back. Use a serrated knife and a gentle sawing motion to avoid crumbling the cake.
- Cut ears and paws from leftover cake:
- Use a knife to create two tall ear shapes and four smaller paw shapes from any remaining cake scraps or that second cake round. Don't worry about perfect symmetry—a slightly lopsided bunny looks more charming anyway.
- Attach all the pieces with frosting:
- Use frosting as your glue, spreading it on the back of ears and paws before pressing them onto the body. Press gently but firmly so they stay in place, and don't fret if some pieces shift slightly during assembly.
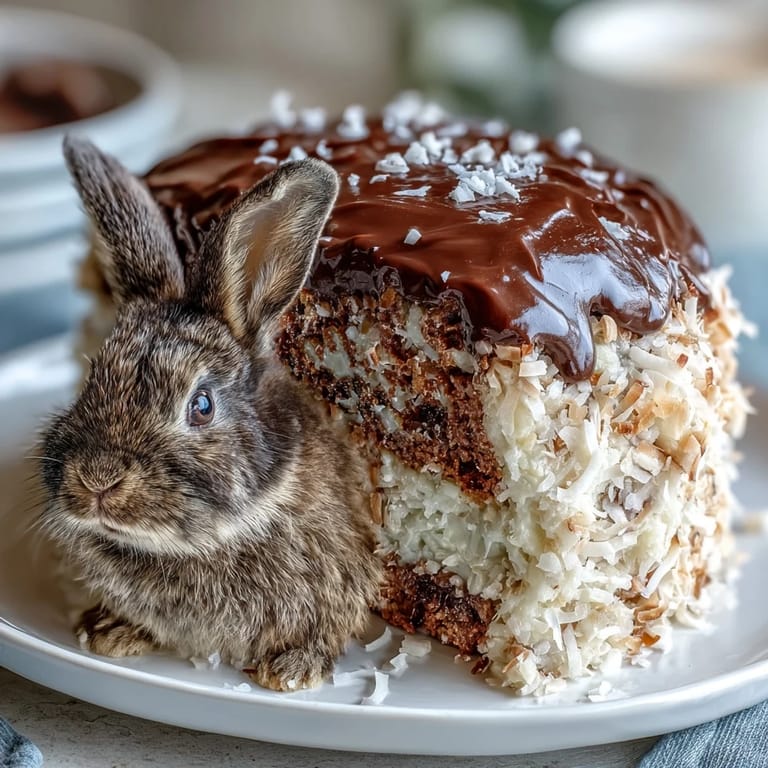
- Frost the entire cake generously:
- Use an offset spatula or butter knife to apply a thick, even layer of frosting over every surface of your bunny. This frosting layer acts as glue for the coconut and creates a clean base.
- Press coconut all over the frosting:
- Working with handfuls of shredded coconut, press it firmly into the frosting so it sticks and creates that fluffy fur effect. Cover every visible surface except where you'll place the eyes and decorative jelly beans.
- Add the finishing details:
- Place the large pink jelly bean at the rear for the tail, add white and pink jelly beans on the paws for pads, and use chocolate chips or black jelly beans for expressive eyes. If you'd like, tint some coconut pink with food coloring and sprinkle it on the ears for extra charm.
- Chill before serving:
- Pop your bunny into the refrigerator for at least 30 minutes to let the frosting set and the layers settle. This also makes the cake easier to slice cleanly when you're ready to serve.
 Save
Save Easter morning, my daughter woke up at dawn and rushed to see her bunny sitting on the dining room table, coconut fur gleaming in the early light. She called it the best cake she'd ever made, even though I did most of the work—and in that moment, I realized that's exactly what recipes are for: giving people permission to create something that brings joy.
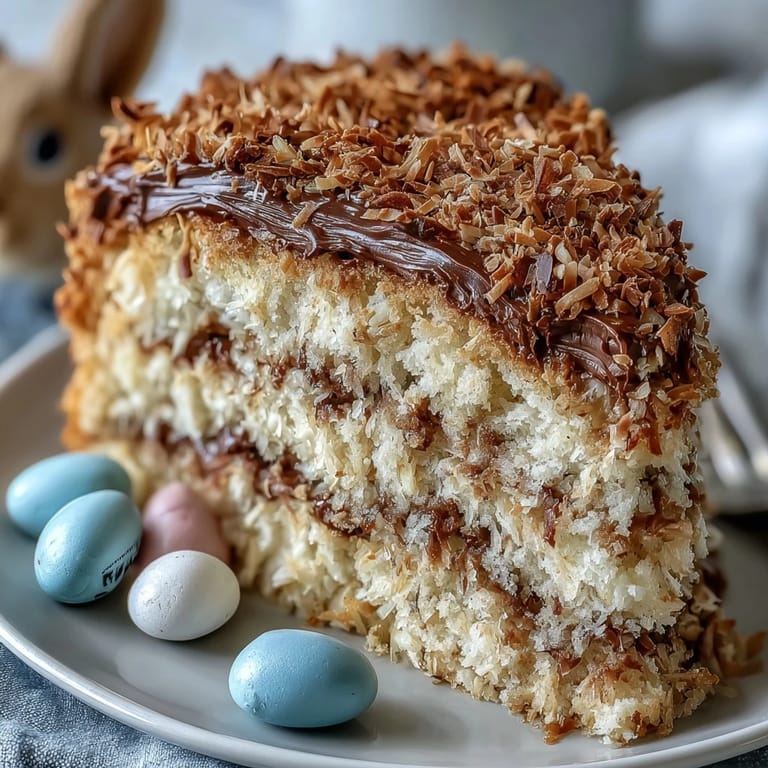
Why Shape Matters
The bunny shape is what makes this cake special, but it's also surprisingly forgiving once you understand the basic structure. You're essentially building with cake pieces and frosting as mortar, which is way less intimidating than it sounds. The beauty is that slight imperfections—lopsided ears, uneven paws—actually add character and charm rather than detract from it.
Flavoring and Variations
The vanilla cake works beautifully as-is, but you can absolutely elevate it with a few drops of almond or lemon extract added to the vanilla for subtle depth. Some bakers swear by adding a tablespoon of sour cream to the batter for extra moisture, and honestly, that's a smart move if your kitchen is particularly dry. You can also tint the frosting pale pink or add a tiny bit of strawberry jam for flavor and color variation.
Make-Ahead Magic and Storage Tips
This cake is actually more forgiving than most because you can bake the layers a day ahead, wrap them well, and assemble everything the morning of your celebration. The assembled bunny keeps beautifully in the refrigerator for up to three days, which means you can literally make this cake on Monday and serve it fresh on Thursday. Room-temperature cake tastes better than cold cake, so pull it out about an hour before you plan to slice and serve it.
- Store leftover cake covered loosely with plastic wrap in the refrigerator for up to four days—the coconut stays fluffy and the frosting doesn't dry out.
- If you want to make this gluten-free, swap in a quality one-to-one gluten-free flour blend and add an extra quarter teaspoon of xanthan gum to keep the crumb structure tender.
- For a shortcut version, use a box cake mix and canned frosting, then focus all your energy on the carving and coconut decoration—nobody will judge you.
 Save
Save This bunny cake has a way of becoming tradition, something people ask you to make year after year. The magic isn't in fancy technique or hard-to-find ingredients—it's in the joy of creating something playful and edible with your own hands, then watching faces light up when they see it.
Recipe FAQ
- → How is the coconut used on the cake?
Shredded sweetened coconut is pressed onto the frosted cake to resemble soft bunny fur, creating a fluffy, textured appearance.
- → What ingredients provide the cake's moist texture?
The cake combines all-purpose flour, baking powder, baking soda, butter, sugar, eggs, vanilla, and milk for a tender and moist crumb.
- → How are the jelly beans used for decoration?
Pink jelly beans form the bunny's tail, white and pink jelly beans are arranged on the paws, and black jelly beans or mini chocolate chips create the eyes.
- → Can this be adapted for dietary restrictions?
Yes, gluten-free flour can substitute regular flour and store-bought mixes can speed preparation. Always check allergens on decorations.
- → What tools are needed for assembly?
Basic cake pans, mixing bowls, an electric mixer, a serrated knife for shaping, and an offset spatula or butter knife for frosting are required.
- → Is there a tip to enhance flavor?
Adding almond or lemon extract to the batter can enrich the cake’s flavor profile for a delightful twist.