 Save
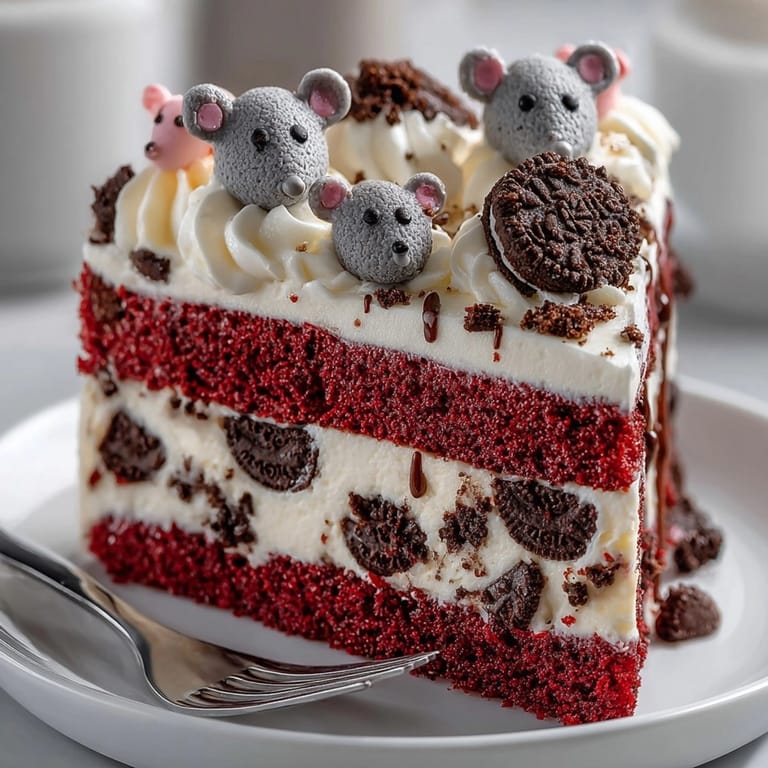
Save This decadent red velvet cake with playful "rat" decorations brings chaotic fun to any celebration table. The rich, vibrant cake layers contrast beautifully with creamy frosting while whimsical fondant rats create a conversation-starting dessert perfect for Halloween parties or anyone with a sense of humor about their sweets.
I first created this cake for my nephew's science-themed birthday party, and the delighted squeals from the children as they spotted the little "rats" made it an instant family classic. Now it's requested for everything from Halloween to April Fools' celebrations.
Ingredients
- For the Red Velvet Cake
- All purpose flour: creates the perfect tender crumb structure
- Granulated sugar: provides sweetness without overwhelming the subtle cocoa flavor
- Baking soda: activates with buttermilk for proper rise
- Sea salt: enhances all flavors especially the chocolate notes
- Cocoa powder: adds that signature hint of chocolate red velvet is known for
- Vegetable oil: keeps the cake incredibly moist for days
- Buttermilk: provides tanginess and helps create tender texture
- Eggs: bind ingredients while adding richness
- Red food coloring: creates the dramatic color look for gel coloring for intensity
- Vanilla extract: balances the flavors with warmth
- White vinegar: activates with baking soda for proper rise
Tired of Takeout? 🥡
Get 10 meals you can make faster than delivery arrives. Seriously.
One email. No spam. Unsubscribe anytime.
- For the Cream Cheese Frosting
- Cream cheese: provides tanginess use full fat for best flavor
- Unsalted butter: adds richness and stability
- Powdered sugar: sweetens and creates proper consistency
- Vanilla extract: rounds out the flavor profile
- Salt: balances sweetness and enhances cream cheese flavor
- For the "Rat" Decorations
- Fondant: in gray and pink colors for creating realistic looking rats
- Dark chocolate chips: for eyes and noses adding edible details
- Cocoa powder: creates a "dirt" effect for authenticity
- Chocolate cookie crumbs: add texture and enhance the messy theme
Instructions
- Prepare the Oven and Pans:
- Preheat your oven to exactly 350°F and position rack in the center. Thoroughly grease two 9inch round cake pans with butter or cooking spray, then dust with flour, tapping out excess. For extra insurance against sticking, line bottoms with parchment paper circles.
- Mix the Dry Ingredients:
- In a large bowl, whisk together the flour, sugar, baking soda, salt, and cocoa powder until thoroughly combined. The cocoa must be evenly distributed to avoid dark streaks in your finished cake. Sifting these ingredients together is even better for perfect texture.
- Combine Wet Ingredients:
- In a separate large bowl, whisk together oil, buttermilk, eggs, food coloring, vanilla extract, and vinegar until completely smooth and uniform in color. The mixture should be intensely red and fully emulsified. Be careful with the food coloring as it can stain surfaces.
- Create the Batter:
- Pour the wet ingredients into the dry ingredients gradually, folding gently with a spatula until just combined. Avoid overmixing which can develop too much gluten and result in a tough cake. The batter should be smooth but still have a few small lumps.
- Bake the Cake Layers:
- Divide the batter evenly between prepared pans using a kitchen scale for precision. Smooth tops with an offset spatula and tap pans gently on counter to release air bubbles. Bake for 30-35 minutes, rotating pans halfway through, until a toothpick inserted in center comes out clean or with a few moist crumbs.
- Cool Properly:
- Allow cakes to rest in pans for exactly 10 minutes on cooling racks. Run a thin knife around edges to loosen, then carefully invert onto racks to cool completely. Cooling properly prevents cakes from becoming soggy or breaking apart during frosting.
- Make Perfect Frosting:
- In a stand mixer with paddle attachment, beat softened cream cheese and butter on medium speed for 3-4 minutes until extremely light and fluffy. Scrape down bowl frequently. Gradually add sifted powdered sugar one cup at a time, mixing on low speed. Add vanilla and salt, then increase speed to medium and beat until silky smooth.
- Assemble the Cake:
- Once cakes are completely cool, use a serrated knife to level tops if domed. Place first layer on serving plate and spread 1 cup of frosting evenly across top. Position second layer carefully and apply thin crumb coat of frosting over entire cake. Refrigerate for 20 minutes to set, then apply final thicker layer of frosting, creating swoops and swirls for a deliberately messy look.
 Save
Save The secret star of this recipe is actually the modest amount of cocoa powder. While many people think red velvet is just a colored chocolate cake, the true magic lies in that perfect balance where cocoa provides depth without dominating. My grandmother taught me this balance, explaining that traditional red velvet cakes originally got their reddish hue from the reaction between cocoa powder and acidic ingredients before food coloring became common.
Storage Tips
This chaos cake maintains its moisture beautifully for up to 4 days when stored properly. Keep it covered in an airtight container at room temperature for 2 days, or refrigerate for longer freshness. The cream cheese frosting firms up nicely in the refrigerator, but allow the cake to sit at room temperature for about 30 minutes before serving for the best texture and flavor experience. Fondant decorations may begin to soften after the second day, so consider adding them closer to serving time for extended storage.
Creative Variations
Transform this chaotic creation for different occasions by changing up the decorative elements. For a science lab theme, replace rats with fondant test tubes and colored "chemical spills" made from tinted frosting. During winter holidays, create snow creatures instead of rats using white fondant and coconut flakes for a snowy effect. For a garden party, fashion the fondant into butterflies, flowers, or ladybugs while maintaining the delightfully messy aesthetic with green-tinted cookie crumbs resembling grass.
Serving Suggestions
Elevate this cake from merely visual to a complete sensory experience by serving it with complementary elements. A scoop of vanilla bean ice cream provides temperature contrast against the room temperature cake. Fresh raspberries or strawberries add bright acidity that cuts through the richness. For adults, pair with coffee spiked with amaretto liqueur or a glass of ruby port that echoes the cake's red hues while adding sophisticated depth to the experience.
Cultural Context
Red velvet cake has a fascinating American history dating back to the Victorian era when cocoa was considered a luxury ingredient. The "velvet" in the name referred to the smooth, fine crumb texture achieved through the chemical reaction between acidic vinegar and buttermilk with alkaline baking soda. The vibrant red color became more pronounced during World War II when beet juice was sometimes used for coloring. This chaos cake version puts a modern, playful spin on the classic while honoring its rich culinary heritage.
Troubleshooting Guide
- Cake Layers Sink:
- If your cake layers sink in the middle check your baking soda freshness and avoid opening the oven during baking
- Smoother Fondant:
- For smoother fondant decorations knead thoroughly and use cornstarch rather than powdered sugar to prevent sticking
- Frosting Too Soft:
- If frosting becomes too soft while working refrigerate for 15 minutes before continuing
 Save
Save Remember that the cake will darken slightly during baking, so the raw batter should be a shade brighter than your desired final result.
Recipe FAQ
- → What makes this cake stand out for parties?
The whimsical rat decorations and playful chocolate dirt effects create a fun, conversation-starting dessert that's ideal for celebrations or Halloween.
- → Can I substitute the food coloring?
Gel or natural food coloring can be used for a more intense or subtle red hue, depending on preference.
- → How do I ensure moist cake layers?
Use room temperature eggs and buttermilk, and avoid over-mixing the batter for a tender, moist crumb.
- → Are there flavor variation options?
Try adding berry jam between layers or incorporate zest into the frosting for added depth and flavor.
- → How do I create the messy decoration effect?
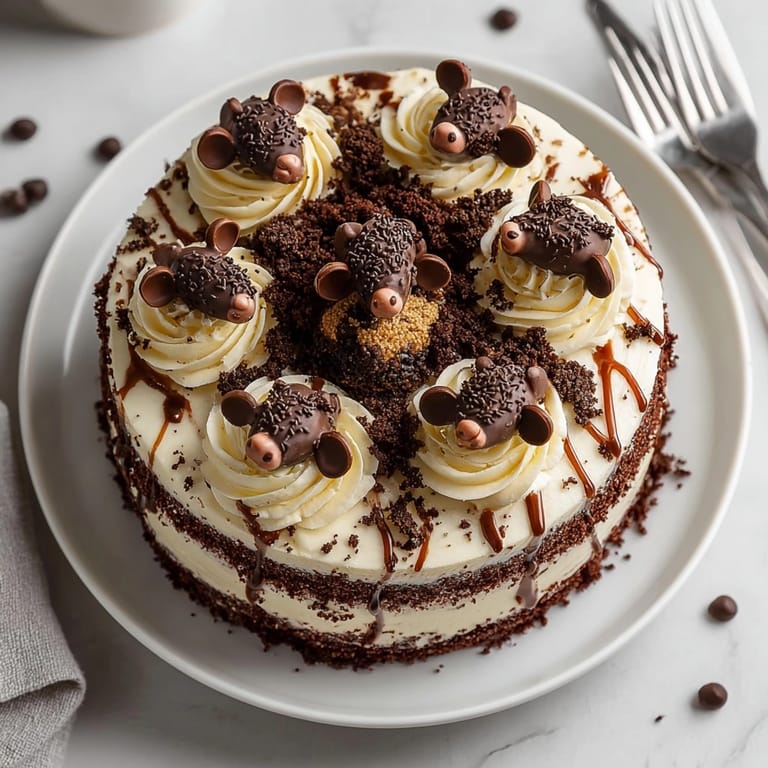
Scatter fondant rats chaotically, dust generously with cocoa powder, and drizzle extra frosting for a true chaotic, playful appearance.
- → Is this suitable for vegetarians?
Yes, all listed ingredients are plant-based or vegetarian-friendly, as long as you check the labels on processed products like fondant.